Saturday 24 November 2012

Thumbnail Sketches - 40-50

The collection of thumbnails, below, are the resulting images, from the combination of the sculptural design with the spherical layout of the liar, in an attempt to merge the sculptures with their surroundings.

In image #41, the inspiration for the imagery derived from the sculptural figureheads of medieval to middle age warships, which are constructed into the front of the ships.

Resorting back to the influences from orreries, images #43 & #44, were an attempt at highlighting the deity connotations of the relating characters, by constructing gigantic statues surrounding the central glass sphere structure.
 
The resurrection of the orrery influences also greatly inspired images #47 - #50.
 

Life Drawing - Session 9

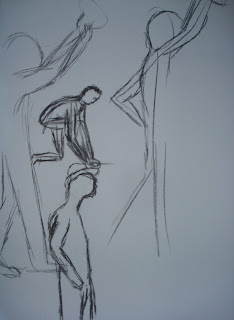
These images (below) were created during a life drawing session on 20/11/2012, where the individual participants of the session modelled, one after the other, focusing on portraying characteristics through posture, in image #1, and physical portraiture, in image #2.

 1.
 
2.


Animation Techniques - Pixilation


The video (above) demonstrates an exercise during an animation tutorial, utilising the technique of pixilation, on 21/11/2012.

Animation Techniques - Character Morphing


The video (above) demonstrates the technique used to morph a simple shape into a character, before further morphing the character into another of a different appearance. The resulting video was created during an animation tutorial, where we worked in groups, on 07/11/2012. My group's image is on the right.

Saturday 17 November 2012

Online Greenlight Review - Secret Lairs

Online Greenlight Review - Secret Lairs

Concept Painting - Secret Lair

The collection of images below demonstrate the process used to create the secret lair concept painting for the solar goddess, highlighting the various techniques combined together to construct the final concept, image #6.

 1.
To begin the digital concept painting, I first sketched the basic shapes of the items within the image, a series of five sculptures, and the cylindrical shape of the room they are located in.
 2.
Once the initial rounded wall was in place, I focused on creating the fiery exterior of the lairs location, at the centre of the Sun, and transforming the cylindrical perspective into a spherical appearance, curving the struts of the glass ceiling to create the perspective.
 3.
I soon ground in some basic colours, signifying each statues' elemental goddess, at this point, focusing more on the central sculpture's detail, as it is the representation of the solar (or fire) goddess.
 4.
Completing the initial shapes of the sculptures, blocking in the colours, I soon focused on sketching the details of the object, placing a ball of fire at the base of the central sculpture and the textured appearances of the other sculptures, to signify their individual elements.
 5.
Finishing the details of the mid ground sculptures, my focus changed to the qualities of the structure of the room, focusing on creating a depth to the image, and completing the sculptures that are present in the foreground.
6.
Once the glow effect had been added, my attention was diverted to the casting of shadows, the emitting of light and the reflective surfaces of the entire room, resulting in the final completed image (#6).

Friday 16 November 2012

Concept Painting - Hero Prop

The images below demonstrate the process used in order to create the final concept painting of the character's hero prop, the magical amulet that  provides the Solar Goddess with her power.

 1.
To begin the painting, I drew the design in the objects simplest form, to gain an idea of it's appearance.
 2.
As I found the layout rather simple and boring, I decided to change it placing the hand of the Chief God holding the amulet, as he passes it to the Solar Goddess. I then began to paint over the original image, on another layer, to create a basis for the detail to be applied to.
 3.
Image #3 depicts the amulet fully painted with basic details, in preparation to apply more specific detail.
 4.
With the amulet completed, I soon began to focus on the details of the hand, using the same technique as the amulet, filling in the outlines with colour before adding detail.
5.
In order to finish the piece, above, I added a light effect, that is emitted from the amulet due to its power, and a simple gradient to the background.

6.
As the glow of the amulet was too sharp, I used a Gaussian blur effect, also changing the opacity, to create more of a glow effect.

Thursday 15 November 2012

Influence Map - 4

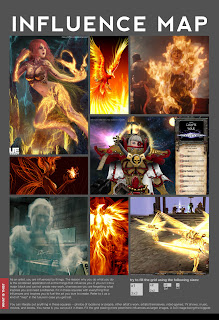
This influence map, below, contains images of orreries, solar flares and a piece of work by Dale Chihuly. These have greatly influenced the design of the external appearance of my lair, which was originally designed as a simple sphere located at the centre of the Sun.

1.

Thumbnail Sketches - 28-40

The series of images (below) are thumbnail sketches for my secret lair, located at the centre of the sun, with a sculpture room, and an external view of the lair (without the surrounding solar gases).

 To create a more deity-like appearance to the lair, I decided to design a room where there are sculptures of each goddess, representing water, wood, earth and metal, four of the five feng shui elements. There is also a large sculpture of the chief god above the doorway. The other images, #28, #30, #31 and #32 are experimental variations of the main sculpture, the solar (or fire element in feng shui) goddess.
 
The above images, #33 to #39, are sketched designs for the exterior of the secret lair, which will be mainly made of glass to create an unusual glow on the interior objects. The entire lair will become totally encased in the gases of the Sun, becoming the power that hold the flames in position. These thumbnails were inspired by the appearance of both orreries and solar flares, resulting in the bizarre rings that rotate around the central sphere.
 
The final thumbnail, image #40, is the resulting image from the combination of all my previous hero prop designs, which was culminated by placing the fiery orb, from digital thumbnail sketch #3, The Globe Room, at the base of the sculpture, and the magical amulet, from thumbnail sketch #7, around the statues neck.
 

Wednesday 14 November 2012

Maya Tutorial - Rocket Motion Path

1. Rocket Animation
 
This Maya animation was created using a motion path, on which the object travels, with several cameras created in the surrounding area, to create sections of film, before being edited together using Premiere Pro.

Maya Tutorial - Car Animation Rig

1. Car Animation
 
The above video is of an Autodesk Maya Tutorial, learning about rigs and how thy are used to insert motion into a Maya animation. Although the tutorial did not include the placement of cameras, I chose to use them, in an attempt to create a more cinematic experience to the basic movements of the setup. Once all the footage was exported, I edited it all together using Premiere Pro.

Animation Techniques - Gesture Poses 1

During the first section of a hand drawn animation tutorial, the series of gesture poses below were created using charcoal, focusing on the basic forms of the body and how they effect characteristics and body language.

 1.
 
 2.
 
 3.
 
4.

Animation Techniques - Bouncing Ball

1. Bouncing Ball, 12fps.
 
 2. Bouncing Ball, 24fps.

The videos above were created, frame by frame, during a hand drawn animation session, utilising a time line in order to place the key frames in the correct positions to accurately portray a tennis ball bounce. These videos were created on Wednesday 14th November 2012.

Life Drawing - Session 8

The images below were created during a life draw exercise, in which we were to experiment with various objects and utensils, including pipe cleaners, charcoal, ink and permanent markers, exploring different techniques to produce the outcomes, on Tuesday 13th November 2012.

1. 

 2.
 
 3.
To create image #3 (above), I devised a technique that utilised ink and masking tape, sketching out the model before using the masking tape to spread the ink, creating fur look to the image.
 
 4.
 
5.
The final pair of images (#4 & #5), were created by pouring several puddles of ink onto the paper, which was scored with a knife in an attempt to create grooves for the ink to follow, before lifting the paper and tilting it to move the ink along it.
 

Sunday 11 November 2012

Digital Thumbnail Sketches - 3 & 4

These images (below) are a pair of digital thumbnails of my character's secret lair at the core of the sun. The first image is of the interior of one of the rooms, with large glass windows and the placement of a hero prop design, a hovvering fire globe of the Earth, where the goddess can witness her effects and influences on the Earth. The second images the exterior appearance of the lair, surrounded by the gases of the sun.

 1. The Globe Room.

2. Secret Lair Exterior.
 

Thumbnail Sketches - 1-27

The images below are a series of thumbnail sketches, of the character, hero props, and location interiors and exteriors, for the secret lairs project.


Animation Techniques - Circle to Diamond


This hand drawn animation was created during an animation tutorial on 07/11/2012.

Friday 9 November 2012

Digital Painting - Session 5

The six digital images (below) were created during a Photoshop Tutorial, on 9th November 2012.

1. Channels.

 2. Tiling.

 3. Digital Painting.

4. Thumbnail Sketch.

5. Texturing

6. Texturing.

Tuesday 6 November 2012

Life Drawing - Session 7

I created the pair of images below during a life drawing tutorial, using ink, originally with an ink pen, but I eventually decided to use my fingers as it made the process easier, on 06/11/2012.


In order to create the bottom image, I used several strands of masking tape, ripping it in half, using them as guides, to be removed after completion, to create an outline of the model.

Saturday 3 November 2012

Influence Maps - 1-3

I have created the three influence maps (below) to aid me in designing the secret lair of my character, gaining an understanding of the character (top),the use of the prop (middle), and the exterior appearance (bottom).

Character

 Prop

 Lair Exterior

Digital Thumbnail Sketches - 1 & 2

The two images (below)are digital painting thumbnails of the exterior of my character's secret lair, which I have created in order to understand my character better.


My designated character is a solar goddess.

Life Drawing - Session 6

The series of images below are sketches created during a life drawing tutorial on 30th October 2012.

The first image (below, top) is the combination of six poses over laid on top of each other to create a single drawing.